Assembling a Regiment
by Avian
The new regiment sets are great value for the money and allow you to get a very varied unit (as opposed to my unit of 49 old plastic goblins), but there are still a few problems.
1. The old "first generation" sets had metal bits for the command models, something which made standard bearers in particular very top-heavy as the top of the standard often weighed more than the rest of the model. This has now been solved with the "second generation" sets which have plastic bits. For the "first generation" I have had to glue coins under some bases but for others I was lucky enough to have some metal bases lying around from some Harlequin minis.
2. It can often be very hard to get a unit into a good formation since they will often have bits poking out all over the place. The new orc and goblin models are also quite a bit larger than the older models. There are a few solutions to this problem, the first and most obvious is to pay more attention when assembling models so that they fit together with the others beside it. This can be combined with my 'Matrix System' to make it easy to remember where each model is supposed to go. You could also use the regimental bases that will fit four models, but I don't like it - I want each model to have it's own base.

Here's what I do:
- After deciding how I want the models equipped I cut the pieces I need from the sprue with a pair of clippers. I then trim away all the mould lines with a sharp knife.
- I start by gluing the legs to the base, followed by the torso. The models in the middle of the ranks all look pretty much straight forward, but the ones at the edges often look slightly to the side, so I twist the body to the left or right.
- Now I split the models into groups, one for each rank. Each group is assembled so that the models can physically fit in beside each other without gaps between the bases.
- The head and arms are glued on pretty much at the same time with the head
first to make sure there is room to fit it in. For the models in the front rank
(who should look like they're ready to fight) it's pretty important to get a
sense of hand-to-eye coordination, so that the model looks to where his weapon
is pointing. The ones in rear ranks could have their weapons more at ease.
With models equipped with spears I try to get a gradual rise of the weapons; the ones in the front rank have them leveled horizontally, while the ones at the back have them vertical. - Shields are a problem, because if you forget about them when you are assembling the unit there might not be enough room between the model and the one to the side of him for him to hold his shield. When something like this happens you can either try to rearrange the models in the ranks to get room or you can glue the shield onto the model's back.
- Accessories is something I leave for the command models or models who are on the outside of the formation - after all, who is going to see if the goblin number four in the fifth row has a pouch in his belt? Another alternative is to save the bitz for conversions (my Mordheim warband and Blood Bowl team uses a lot of them).
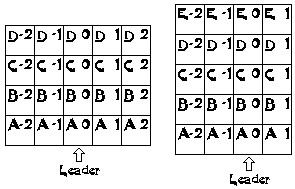
- After all the pain of assembling the models in a formation where they all fit with no gaps between them it's bloody annoying when you can't seem to remember this formation the next time you are unpacking the unit, so I came up with this little ingenious system of labeling the undersides of the models' bases. I call it 'The Matrix System' The system consists of a letter followed by a number which can be either positive or negative. All the models in the front rank get the letter 'A', those in the second rank get 'B' and so on. The unit's standard bearer (assuming the unit has one) gets the number '0', as do all the ones behind him. This means that the standard bearer is A0, the one directly behind him is B0 and so on. The guy to the left of the standard bearer gets the number '-1' as do all the ones behind him. The model to the left of him gets the number '-2' etc. The model to the right of the standard bearer gets the number '+1' or simply '1', to the right of him is '2' "und so weiter". When you have done all this you get something like this:

Ignore the bit where it says 'Leader' that was for fifth edition. In this edition it should say 'Standard bearer', but I haven't got around to updating the picture yet.
Normally the leader and musician would now be 'A-1' and 'A1'. This system is also infinitely expandable.

Other related articles
| Back to the Main page |