Making Banners
by Avian
In this article I will write a bit about how to make banner poles and banners for your troops. Something I think is a bit stupid is that GW and other companies rarely make banner poles that you can hang a banner on. If you look at the new orc regiment the banner pole has a lot of trophies on it, but there is no room for the actual banner. Often the banner poles are also way too short for a decent sized banner.

Making banner poles
There are basically three types of banner poles: "I" type where the banner hangs horizontally, "T" type where it hangs straight down and "L" type which is a combination of the two others. See the illustration below.
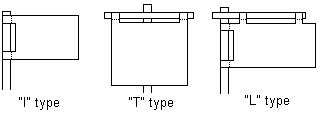
When making a banner pole you should consider what type of unit will be carrying it. Cavalry would probably use an "I" type, while foot troops could have a "T" or "L" type. The "L" type is the one where getting the banner onto the pole is most difficult.
What do you need?
- Miniature that you want to convert into a standard bearer. If you have one carrying a spear then this would be very easy to convert.
- Cocktail sticks, barbecue skewers or similar. About 3 mm in diameter
- Thin metal rod, about 1 mm in diameter. Piano wire, paper clips or needles will all work
- Thin metal wire, about 1/2 mm in diameter (not used with all types)
- Assorted bitz - skulls, chains and other trophies
- Glue - plastic and super
- Tools: drill or pin vice with bit the same diameter as the metal rod or slightly larger, model saw or knife, clippers
"I" type
This is the easiest type to make.
- Take one of the models who are holding his hand out about horizontally and cut off whatever is in his hand. I use my trusty Dremel, but a model saw, knife or clippers will also work. Make sure that the top and bottom of the hand is flat or it will be difficult to drill.
- Take a cocktail stick or similar and cut it into two pieces. One for the part above the bearers hand and one for the part below it. About 5 cm or more is a good length for the longest bit and the shortest bit should of course be as long as the distance from the models hand and down to the ground.
- Drill a hole through the model's hand straight down and drill similar holes into the two standard pieces. This might be bit difficult at first so practice on a few cocktail sticks until you feel confident. The holes in the sticks should be at least 1/2 cm long.
- Now you pin the two parts of the pole in place. Cut two pieces of metal rod about 1 cm long each and clue them in the holes in the cocktail sticks. When the glue has dried glue test to see if the two pieces will fit into the hole through the model's hand. If not then shorten the metal rods. After you have made sure glue the two pieces into place.
- Add trophies to the top of the pole, but
make sure that you can still attach the banner. If the trophies are big you
might consider pinning them in place as well.
Examples: My black orcs have an unfortunate chaos warrior at the top of their standard, the wolf riders have a battered bretonnian helmet and the savage orcs have a horse's head.
"T" type
This a very nice and simple type of banner pole and can be used to modify the banner pole that come with the model.
- Do parts 1 - 3 as for the "I" type above.
- Cut a cocktail stick a bit longer than the width of the banner to make the crosspiece.
- Using a sharp knife cut a groove into the vertical piece of the pole so that the crosspiece will fit into it. It does not have to be to deep and should not be deeper than half the diameter of the stick.
- Glue the crosspiece into place. When the glue is dry wrap thin wire around the joint so that it looks like the two pieces are tied together.
- Glue the two pieces of the pole into place as for 4) above.
- With this type it's probably better not to attach the trophies until you have attached the banner
"L" type
This is the same as the "T" type, except that the length of the crosspiece does not have to be the same as the length of the banner. Draw some sketches and see which length you prefer.
Making banners
I make all my banners from the thick aluminium foil that you get from pie trays (the one-use type). The advantage of this is that it can be bent into almost every shape and hold it, is easy to paint on and you get a pie to eat. The disadvantage is that paint does not stick as good to it as it does to other materials. Other materials that you can use is thin aluminum foil (not a good choice) or paper.
What do you need?
- An idea
- Thick aluminum foil or paper
- Paint
- Glue - plastic or super
- Tools: scissors or scalpel, pen
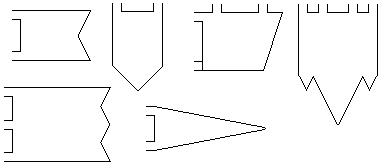
Banners come in many shapes, from the simple rectangle to the more complicated. Below I've included some examples of shapes.
How do you do it?
- Draw a sketch of how you would like your
banner to look. The better you make the sketch the easier it will be to paint
it later. The banner should be in the style of the unit.
The shapes can be just a simple shape, such as the phallus symbol on the banner of my Big Dicks or something really complicated, like the panther face on the banner of my Black Panthaz. For complicated shapes I usually look through my games books or search the Internet for inspiration. - Decide how big the banner should be and what shape. Sometimes you have to stick with the size of the banner pole, but I often decide on the size of the banner first and then make the pole to fit.
- Draw the shape of the banner onto the material you are going to make it from. Add taps so that it can be attached to the pole. These taps should be about 1,5 x 0,5 cm depending on the diameter of the pole. Usually two taps are enough but larger banners will often use three or four. A banner for an "L" type pole should always have four taps.
- Cut out the banner and prime it. If it will have a motif consisting of mostly light colors then prime it white, otherwise you might use black, red or some other color.
- Paint the motif. Start with any large symbols in the middle of the banner first and fill in the smaller details as you go. If you intend to have borders to the banner make sure there is room for them. Orc banners often have a checked border of black and white squares. The background color of the banner should be painted on last. Banners for "I" type poles should theoretically be painted on both sides, but I rarely bother. The other side is often reserved for some slogan in orc-tongue or the unit's kill record (the number of important enemy units defeated).
- When you have finished painting the banner it is time to attach it to the pole. Carefully bend the taps so that they fit around the pole and glue them in place one at a time. This can be difficult if you're using a bad type of glue and if you're not careful you'll glue yourself to the banner. One method which I've found to be quite good is to first glue the taps to the pole. Then when the glue is dry I glue the taps to the back of the banner. A pair of tweezers is often a good help.
- Bend the banner into shape. If the banner is an "T" or "L" type then bending will look strange so this is mostly for "I" type poles. Use a thick pen and gently bend the banner around it in a series of S shapes.
- For effect the banner can also be cut so that it looks more ragged. This suits barbaric species such as orcs, skaven and beastmen.
| Back to the Construction page | Back to the Main page |