Making Movement Trays
by Avian
I can't understand why so many players I meet don't have proper movement trays for their models. Very often I face people who still, after several years of playing, cut up pieces of paper to place their minis on as they move them around on the table. A good-looking movement tray is surprisingly easy to make and below I will list several methods for making them.
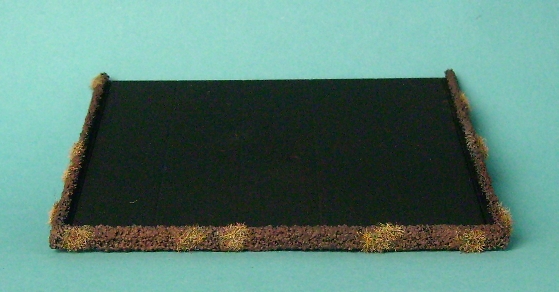
Typical movement tray from my army

Budget movement trays
This is the cheapest method, it costs next to nothing and still gives good-looking results. The biggest problem is finding good materials for the base (at least if you don't want to pay anything).
You'll need
- Some kind of material for the bottom plate. Plasticard (about 2mm thick) is ideal, but I have found few hobby stores locally that sells it. Alternatives are cardboard, carton, wood or any kind of rigid plastic; I know that some people use CD covers as the base. Regardless of the material, it should not bend easily (a lot of cardboard will warp when painted), be reasonably strong (thin wood might break) and not too difficult to cut.
- Edging material. I have found that 3 mm sqare pine rod works very well - this is sold in a lot of hobby stores and is quite cheap. I have previously used matches, but they are a bit thin compared to how thick a model's base is and looks a bit unnatural.
- Glue. Typically super glue to attach the edgings and wood glue for the texturing material.
- Some kind of texturing material. Personally I use sand and add a few clumps of static grass, but the important thing is that it should match the bases of the unit you intend to use the tray.
- Spackle. Optional, in case you need to fill in some gaps in the edging.
- Paint. I spray the trays black and then paint the edges in a mix of browns and greys.
- Tools: Hobby saw and/or sharp knife. File or other similar tool for sanding down the edging.
Step 1
Making the movement tray the correct size is of course vital. I prefer to add 5 mm to any side that will be edged, to make room for the edging material and give my models a little extra room in case they don't want to rank up right next to each other. I don't edge the backs of my movement trays, mostly because it makes the unit look neater if I suddenly decide to field it in more ranks than usual. It is also slightly less work and saves a bit of material (which isn't important with normal movement trays). For that reason, my trays are 10 mm wider and 5 mm deeper than the units they are made to fit.
The cutting of trays are done with a solid, sharp knife or a thin saw. If necessary, sand down the edges a bit with a file or sand paper.
Step 2
Cut the edging material to size and glue it on around the sides of the tray you want to edge. If you are using cardboard for the base and wood for the edges you can get away with using wood glue for this, but otherwise superglue is usually the thing. If you have used something rectangular for the edging, it is probably a good idea to sand down the outside of the edging to make it smoother and less angular.
Step 3
Apply texture to the outside of the edging. I do this by covering each edge in turn with wood glue and dipping it in a tub filled with sand. As a note, I use normal sand that has been siften to make sure it has a uniform grain size (0.5 to 0.7 mm, if I remember correctly); you are of course free to use whatever you like. It is probably unavoidable that you will get a bit of sand underneath the tray or on the inside of the edge. This should be removed once the glue has set.
After all sides have been textured, I go over them once again with thinned-down wood glue (it should be a bit thicker than milk), to bond the surface better so that grains of sand will not rub off during use. Once this second coat of glue has dried, I spray the trays black and then paint the edges to match my bases. I also add some clumps of static grass.
GW modular movement trays
I was pleasantly surprised by this set, it was easy to work with, gave me a decent number of trays and had a very reasonable price (not as cheap as budget movement trays, of course). The base is thick, quite rigid plastic and the edges are easy to glue on with plastic glue. If you are interested, I can inform you that the edges are glued on outside and beneath the base plate, which means that there is about 1 mm between the base plate and the table when you are finished.
You get 16 corners for the edges, which, since I only edge three sides of my trays, means that you can edge eight trays with what you get. You can also improvise corners by cutting the side pieces at an angle, but this would be a bit fiddly. Cutting the plastic from this set also requires some effort, as it is quite robust, but a sturdy, sharp knife works well enough.
There are two sheets of plastic for the bases of the trays in the set, each being 20 x 20 cm. They are marked with 20 mm squares on one side (10 x 10 squares) and 25 mm squares (8 x 8 squares) on the other. For the sake of flexibility, I would have preferred a more oblong shape, but I accept that this is difficult to do if they want to make the sheets useable for both large and small bases. Some people have complained that each sheet is only large enough for one large tray and that you get a lot of off-cuts; these people have obviously not realised that you can glue smaller pieces together to form larger ones and it is in fact relatively easy to make two trays large enough to hold 30 Orcs from a single sheet. You just have to strengthen the join on the underside of the tray with a little piece of plasticard or similar and the edges will also do their part in making sure the thing does not break up. I made three 5 x 4 sheets, one 6 x 3 sheet, two 6 x 2 sheets and two 5 x 2 sheets, all for 25 mm bases.
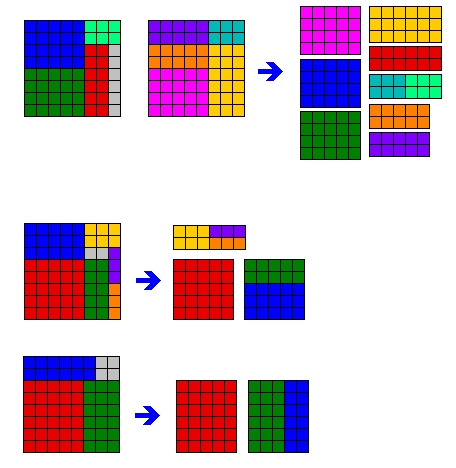
What I got out of the package and a couple of examples on how to get two large trays from the same sheet
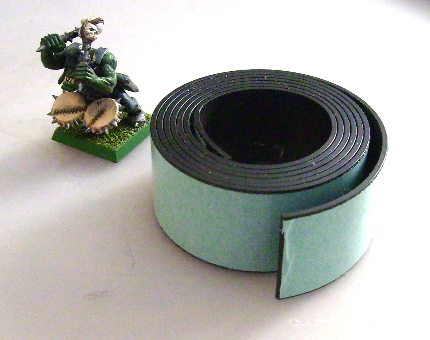
Magnetic movement trays
Magnetising your units have a couple of big advantages: you can transport fragile models much more safely and you save time setting up your units at the start of a game (for units that tend to be removed wholesale, such as Goblins, you also save time putting them away when they die). There are several ways of making a magnet system for your units and I have gone for a relatively cheap and simple one. I prefer to magnetise most of those units where this is practical, which is to say most of my plastic infantry blocks. Metal models obviously require more magnetic material per base, while cavalry models are more difficult to magnetise due to what the inside of their bases look like (in addition they are also often metal, which means you need more magnetic material, but often have room for less). The only cavalry units I have magnetised are my spider riders, who do not have bases with slots and therefore more room for magnets. They are also nice and light, being entirely plastic.
For the base, I use 0.7 mm iron, bought in 40 x 25 mm sheets at a local DIY/utility chain called Clas Ohlson. It costs about £6, which is somewhat less than the modular movement trays cost (in Norway at least) for a bit more material and more flexibility. I made six trays out of it: one 5 x 6, one 6 x 4, two 6 x 3, one 5 x 3 and one 6 x 2, all for 25 mm bases.
Step 1
To cut the plate, I borrowed a pair of plate shears from a workshop at the university. Plate shears are like a solid pair of scissors, but double-hinged (if you can imagine such a thing) to further multiply the force you apply. I have previously borrowed the use of a huge machine called a drop shear (or, rather, that is the direct translation of it into english, I don't know the exact term), which works like a guillotine. It gave very straight cuts and did not warp the material, which cutting it manually will do, but setting it exactly right was difficult and I was always a bit worried I might cut off a finger or two.
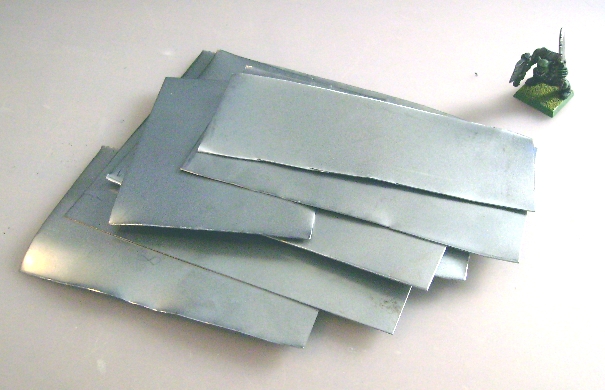
Rough sheets
Step 2
Cutting the plates with muscle power tends to, as mentioned, to warp the metal a bit (less for wide trays, more for narrow ones, for obvious reasons). To get them flat again, I took my hammer and pounded them carefully until they were sufficiently level. Cutting metal also tends to leave sharp edges, which I went over with my trusty Dremel and sanded down.

Hammered flat sheets
Step 3
Now, for some reason which has never been really clear to me, stainless steel plates are not magnetic and the regular iron plates I use tend to go rusty after a while. For my first generation of metal trays, this meant rust stains on whatever the trays got placed on, which was not a good thing. I thought of spraying the underside with spray paint, but reckoned that it would get scratched and rust would build up eventually after all. After some pondering, I hit on the idea of covering the underside of the trays with contact paper. Once again I only guess at what the thing is called in english; if I get it wrong, I can tell you that it is a clear plastic (Why is it called contact paper if it is made of plastic? I don't know.), sticky on one side and used on books to make them more resistant to wear and tear. The contact paper is wrapped around the edges and attached in about 5 mm on the top of the plate, to prevent it from peeling off.
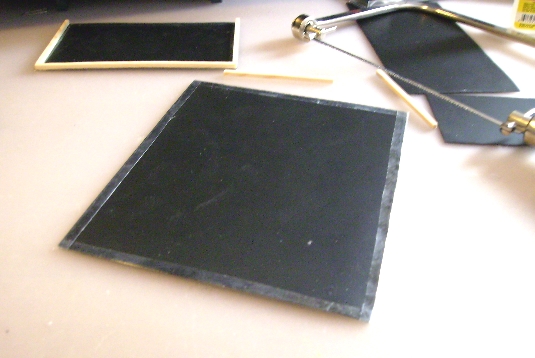
A movement tray with contact paper on one side and sprayed
black on the other.
In the background you can see one with edging glued on.
Step 4 - 5
At this point, you can edge and texture the trays like you would for a regular movement tray (see above).
Magnetising your models
For magnets I use a type of magnetised rubber tape (I assume it contains a lot of iron as rubber is not otherwise known for its magnetic properties). One roll, 25 mm wide and a meter long, also bought at Clas Ohlson costs about as much as a sheet or iron and gives enough magnetic material for about a hundred models. I cut it lengthwise and use pieces 20 mm long for models on 25 mm bases and 15 mm long for models on 20 mm bases. For metal models, you might need to use bigger pieces, or alternatively you may wish to use single neodynum magnets, which is a bit more expensive and a bit more fiddly to work with as they are so strong.
Magnetic tape
If the magnet is not entirely inside the model's base it will look a bit strange. A friend of mine glued on the magnets beneath the bases and that made all his models noticeably taller, which did not look very good. For this reason, bases without slots are best as you will have more room for the magnet and I habitually cut the tabs off my models who normally go on bases with slots to make them work better with my magnet system. Ideally, the magnet should just tough the surface the model is standing on, and any gap decreases the power of the magnet. As the magnetic tape is not quite thick enough for this, I use a little piece of carton in between the magnet and the base as a spacer. Magnetic tape has one sticky side, but I have never found the glue there strong enough, so I use normal white glue to attach the magnets to the bases (this is mainly due to cost and ease, super glue would be better and if any magnets come loose I reattach them with super glue).
Transporting magnetic trays and models
Most of the point of magnetising your models is that they can be transported around on the tray, which means you are not putting any pressure on delicate parts, which you would be with normal foam trays. You also save time when setting up models, which is very nice for large armies, such as greenskins. Finally, models tend to take up less space in this way, as they cna be packed in tighter.
When transporting my minis, I use a standard, reasonably cheap aluminum tool box (I won't mention who made it; the handle was rubbish and broke so I don't recommend it). The inside is covered with a layer of reasonably hard foam and this foam has a series of slots in it where you can place internal dividers. What I did was to just use the crosswise dividers and then make a series of shelves that fit in between them. Originally I made the shelves out of corrugated cardboard because I was still experimenting and didn't want to make anything that required a lot of effort in case (ha, ha) it didn't work. Lately, though, all the shelves have been made using 4 mm thick wood (I believe it is called fibreboard in english, though I may be wrong).
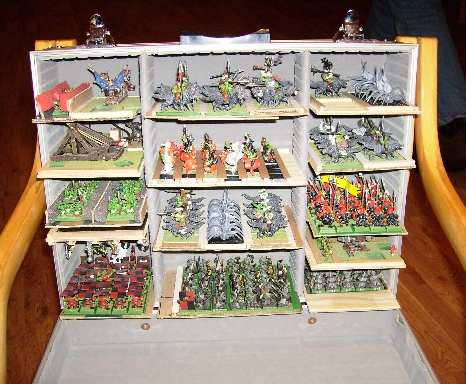
My carrying case, carrying my all-goblin army (this
picture is a
bit old and many more models have since been painted...)
To these shelves, the movement trays are attached with a sort of clamp at one end and a neodynum magnet embedded in the tray near the other end, so that they trays stay securely in place and each shelf fits various sizes of trays. Some shelves don't have this system and just have metal plates on them (attached with contact paper), to hold single magnetised minis or magnetised units that don't have iron movement trays, either because I have not made one for them yet or because the tray would not fit inside my shelf system. It is worth noting that since I started using this system, the way I set up my units have to some degree been limited by what will fit on the shelves. I would probably not make any 6 x 6 Goblin units, for example (though fortunately there is not much reason to).

A shelf designed to hold a tray for up to 30 Orcs
I have also developed ways of extending my system to transport cavalry models, using shelves with a set of clamps placed so that cavalry models with just be able to slot in between them. The same goes any large model: Ogre-sized ones, chariots, war machines (if they are on bases) and even my Wyvern will fit in nice and safe. Perhaps I will do an entire article devoted to my system one day.
| Back to the Construction page | Back to the Main page |