Greenskin Battle Tactics
by Avian
Realising that my page lacked something that brought all the little individual tactics together and showed how the worked in the context of an army, I thought I'd do an article on battle tactics (some people call this strategy, but that is wrong). This article assumes that you have a decent knowledge of tactics already, so when I talk about using fast cavalry to divert nasty enemy units, I assume that you already know what I am talking about. However, all 'missing details' are covered in other articles (Goblin Fast Cavalry for how to use fast cavalry for diverting, for example) so no need to worry.

Contents
Standard line
This is the basic tactic used by the Orcs & Goblins and variations of it are commonly used by combined-arms forces of most other races as well. It is based around a strong, relatively slow centre which advances while the units on the flanks encircle the enemy army to pin it down by threatening its flanks and rear.
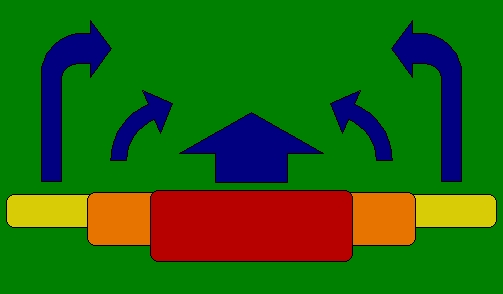
The army is deployed in five sections, though in practice these will tend to overlap somewhat: 1) the main battle line in the centre (red), 2) the two far flanks (yellow) and 3) two intermediate areas (orange) which bind the three others together. The main battle line will typically consist mostly of infantry, which are quite resilient but not overly quick and they will plod up the battlefield, defeating whatever comes their way with the help of their own support units, or units from the intermediate sections. The units on the flanks should be quite fast will make sure the enemy units can't get away from your main battle line units and take out vulnerable units, such as war machines, while units in the intermediate area will help out units in the neighbouring sections or work together with each other.
The main battle line
Units on the main part of the battle line will be your big blocks of fighting infantry, along with their support units. In a standard mixed army, your fighting infantry blocks will mostly be Orc Boyz, though Savage Orcs, Black Orcs and Big 'Uns are also possibilities. In a Goblin army, your fighting blocks will probably be either Squig Herds, or large blocks of gobbo infantry led by Warbosses or Big Bosses. If you are running an army not based around infantry you could use this tactic and have your main fighting units in the main battle line (i.e. Boar Boyz in a cavalry army, or Trolls), but this tactic is more useful for infantry armies and armies based around faster units will probably find that weighing either or both flanks is better.
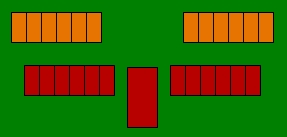
Supporting your fighting infantry blocks will be smaller units of weaker (i.e. gobbo) infantry, chariots, Snotlings and small Troll units (1 or 2 Trolls). Typically, you'll want to place your support units in between the main fighting units, so that there is more than 6" between fragile units that can cause Panic in each other, in the manner shown in this illustration.
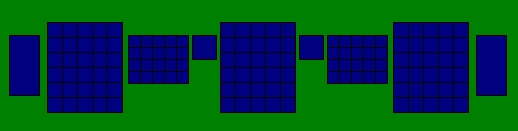
Here we have three big blocks of 30 Orc Boyz, along with their support units: two Boar Chariots, two units of 20 Night Goblins and two single Trolls. Typically we'd place our general in the central unit and other Big Bosses (including the Battle Standard Bearer) in the other units of Orc Boyz. If the characters ride boars (which they should if they are common or Black Orcs) then they can easily hop from one unit to another depending on where it looks like they'll be needed the most. It is also important, if we have units such as Night Goblins and Trolls, who have very low Leadership, to have these close to the general. Single Trolls are also quite useful as diverting units (with only a Unit Strength of 4 they can't cause Panic in anything) and a central position for them means that they can get into position for this more easily. If we wanted to, we could also use small units of fast cavalry as support units in the main battle line (though I reckon that most of the time, they are more useful further out), in which case we could place the Night Goblin infantry a bit further back and place the Spider or Wolf Riders in front of them. Usually you don't want to place Animosity-prone units behind each other, but with support units this is less of a problem, though if the fast cavalry gets shot the Night Goblins might have to take a Panic test, which is the reason I prefer my fast cavalry outside the main battle line.
Alternatively, you can place the blocks of Night Goblins further forward and get a checkerboard formation similar to what the ancient roman army used (though they used three lines instead of two). This is useful against armies that come at you very quickly with very nasty units. The gobbos are less useful in direct support in cases like this and they are more useful in diverting enemy units. I am not fond of this approach normally, firstly because the gobbos might easily get stuck in between the battle lines and get in the way and secondly because it limits how the units behind them can move.
In battle, the units on the main battle line advance steadily forward unless the enemy has some nasty units that come rushing at them, in which case this isn't really necessary and you use your support units in the intermediate section (possibly helped out by some of the support units on the main battle line) to divert or bait them into going where you want them to. You can then counter-charge with your fighting blocks and hard-hitting units such as chariots or Trolls, while using your weedier units (the gobbos) to make sure your opponent cannot reinforce his units by charging yours in the flank. If your opponent advances with not too nasty units you can either take the charge with your fighting blocks, who should hold, especially if led by a decent fighter character and having the general and/or BSB nearby. Or you can call a Waaagh! to get the charge on him if he cowers just out of charge range.
It is important to realise that greenskin infantry is quite slow, partly due to a low basic Movement, partly due to Animosity and partly because they tend to come in large units that makes wheeling extra slow. Therefore any infantry you intend to fight with should be placed in the main battle line or, if that isn't possible, in the intermediate zones. If you start placing combat infantry units out on the flanks they have a high chance of just being ignored and you have wasted good points. Related to this, it is important to know where to place your main battle line. Usually the choice will be somewhere close to the centre of your deployment zone, which should give you a relatively short path to the enemy which hopefully isn't obstructed by too much terrain. However, if your opponent places most of his army towards one flank you'll probably need to adjust accordingly and you might even end up in a situation where you only have one flank, with the edge of the table taking up the other side. Because infantry-based greenskin armies cannot redeploy quickly, it is important to get a good idea of how your opponent is going to set up before you commit your important, slow blocks. The best way of doing this is to have a good amount of cheap units (fast cavalry, Snotlings, single Trolls and Pump Wagons are all great for this) you can deploy first and your opponent should be mostly done placing his units before you have to place anything important.
The flanks
The main purpose of the units on the flanks is to limit where the opposing army can go and make sure it doesn't move out of the path of your main battle line. This can be done either by threatening to flank charge enemy units, denying march moves, or placing themselves in their path and blocking them from going where they want to. These tactics are described in more detail in my article on >Goblin Fast Cavalry<. Secondary tasks are hunting enemy war machines or other fragile targets. Because they are so fast, fast cavalry Goblin Wolf Riders tend to be your best units in these sections. A character on a Wyvern can also do well out on the flanks, though with a Wyvern you will probably not want to go with an infantry army (unless you are playing at 3,000 pts or above) and hence not use this battle tactic at all. Spider Riders can work out on the far flanks, but because of their lack of flat-out speed, I tend to prefer them in the intermediate zones instead. War machines can find a place out on the flanks and particularly Spear Chukkas can find opportunities for flank shots at knights there, but your opportunities for good targets may be limited unless you find a good hill to stand on. And finally, you could place the odd unit of dead cheap gobbo infantry or Snotlings far out on the flank, where they can sit picking their noses and claiming a table quarter.
Because it is hard to go wrong with placing some units of fast cavalry Wolf Riders out on the flank (even if your opponent goes for some radically odd setup they can quickly adjust their position with one or two 18" march moves), these units are good as the first units to deploy. It doesn't really tell your opponent anything about your plans and most things he'll place in return will tell you more about his.
The intermediate sections
The greenskin army contains quite a few units that have either random movement, or who are a bit faster than infantry, but not as fast as Wolf Riders. These units I will often place in between my far flanks and the main battle line, where they provide a link between the other sections. This includes Squig Hoppers, Pump Wagons, Giants, Trolls, Wolf Chariots, Boar Boyz and Spider Riders. Typically you want your units to have one or more of the following abilities: 1) Movement 6+, 2) the ability to turn on the spot with no penalty, and/or 3) the ability to ignore terrain as you move. You could also place slightly tougher units of Goblins there, but as with the Trolls, they prefer to stay within 12" of the general. War machines and archers can also do well here, because the other units in this section tend to push forward rather quickly, which gives them good lines of fire.
Units in the intermediate section should be quite manoeuverable, quite hard-hitting and work together with units either on the main battle line or on the flanks to bring down enemy units. What these units cannot usually do very well is to receive charges, so they use their good manoeuverability to avoid this. Pump Wagons, for example, don't do well on the flanks because they are quite slow (unless you roll very well) and don't do well on the main battle line because they cannot flee from a charge, which can let an enemy unit get an easy charge and an overrun move after destroying the rickety Pump Wagon. Hence I place my Pump Wagons in the intermediate zone, where an enemy unit that wants to go after them will be diverted from more worthwhile targets and may end up turning its flank to units on the main battle line. Similarly, Squig Hoppers placed in this area can take cover in or behind terrain and hop in to charge units being engaged by my units on the main battle line. They can also charge in any direction, so if something is threatening to outflank you, they can often intercept it.
On several occasions I have had war machines in the intermediate zones work well with Wolf Riders on the flanks. The Wolf Riders block in an important unit of, say, knights, so that the knights can either spend most of the battle trying to get around the Wolf Riders, or they can charge them, in which case the Wolf Riders will flee and the knights will be excellently placed for a flank shot from a Spear Chukka.
Refused Flank
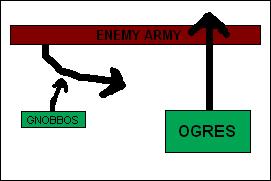
This battle tactic relies on you having an army with quite a lot of fast elements, though slower infantry units are also useful for holding the refused flank. With my Ogre army I used this tactic a lot, stacking my nasty Ogre units on one flank to overwhelm that while my Gnoblars got in the way of any unit from the opposite enemy flank who wanted to get into the game.
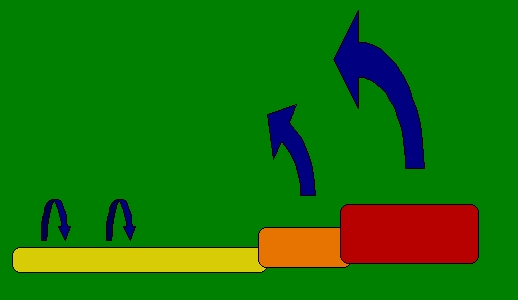
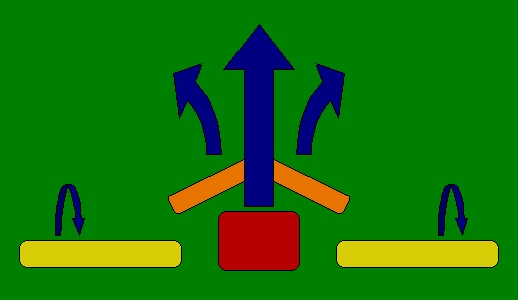
Here the refused flank is on the left (yellow), while the sweeping flank is on the right (red) and we again have an intermediate section (orange). The sweeping flank will consist of units that are fast or hard-hitting (or both), which we use to attack just a portion of the enemy line with. By concentrating most of our army against a smaller portion of the enemy line, we hope to quickly defeat that and go on to roll up the enemy line. The intermediate section consists of units that are slightly slower or slightly less hard-hitting (or both), while the units on the refused flank is simply tasked with keeping the units on the furthest enemy flank from helping out the flank we are attacking.
As a variation of this, you could split your attacking units between both flanks instead of just one and have a refused centre instead. An army with a lot of cavalry, backed up by some war machines or missile units in the centre can be quite difficult to deal with for the wrong army. It is rather similar to the standard line tactic discussed above, but the centre is not intended to fight and you should therefore be wary of advancing it. If your opponent's centre moves quickly across the table and your flanking forces are too slow to react, you may have to pull your centre further back to prevent the enemy force from breaking through it.
The sweeping flank
Your units on this flank must move quick enough to let you defeat one flank before the rest of the enemy army can do much about it, and naturally it must also be nasty enough to actually defeat the flank and not just be bogged down. If this is a problem they can also get help from units in the intermediate section, so that you can threaten units from two sides at once and be more or less certain of getting a flank charge off. A Wyvern rider combined with a reasonably nasty unit of cavalry, for example, is good at this. Greenskins in general have some problems with the refused flank tactic because any fast unit that isn't a character is prone to Animosity and taking a Black Orc to avoid this has its own problems.
The refused flank
The job of the refused flank is basically to be a nuisance for those parts of the enemy army which are not under attack at the moment and stop them from coming to the aid of those parts that are being splatted. For this reason, you might also call this the "confused flank". Normally the enemy relief force (their left flank if you are attacking the right, and vice-versa) will want to cross in front of the rest of their army to make a unified front facing your sweeping flank. Your refused flank will in turn threaten the flank of these units, slowing them down or making sure they never get to where they want to be in time. This can either be done by moving up a large unit of cheap infantry to charge the enemy relief force in the flank to hold them up or even defeat them, using a fast cavalry or similar unit to divert them, or by using Spear Chukkas to fire at their flanks. Failing that, just hanging around within 8" and denying him valuable march moves can work wonders. Your opponent must then, if he wants to get anywhere reasonably quickly, spend valuable time and effort to chase away the units from your refused flank. Ideally, you might even lure relief force units away from their path entirely as they get distracted and end up chasing throwaway units (this is particularly effective against units that must pursue if they can, such as those suffering from Frenzy or Hatred).
Units on the refused flank don't need to be very nasty and it is preferable if they are cheap. As mentioned I use Gnoblars for this with my Ogres and it is amazing how much bother you can make for your opponent with a bunch of 2-point models, even if they are quite hopeless in combat. In a greenskin army, comparable units would be decently large units of cheap Goblins, war machines or fast cavalry units.
This tactic also works quite well against more static armies, such as Empire or Dwarf armies with plenty of handguns. These armies often have trouble adjusting to enemies coming up on their flank, as units with handguns cannot move and fire, and are in any case quite unwieldy. In these cases you might not need as many units on the refused flank and a couple of bases of Snotlings who sit behind a wood and quietly hold a table quarter might be enough.
The intermediate section
This is where you place those units that are fast enough to get in on the action, but not quite as fast as they need to be to go up and flank charge something. The border between the intermediate section and the sweeping flank will always be unclear, but typical units to place here include Giants, Trolls, chariots and Squig Hoppers. You should always have a decent amount of units with enough Unit Strength to negate rank bonuses (i.e. US5+) here, or enemy units that come under threat from your sweeping flank will just turn to face that and much of the effectiveness of your plan is lost.
Remember that units flee away from their largest foe, so if you managed to attack an enemy unit from the side on and break it, it may flee along its own battle line, causing several units to take Panic tests. Meanwhile, your victorious units can pursue after them into the next unit along the line and if that unit is engaged already but hasn't fought yet your units can fight twice in the same turn.
Flying Wedge
The point (ha, ha) of the flying wedge is to quickly strike with overwhelming force at a single weak point in the enemy battle line, smashing a hole through it and expanding from there. In Warhammer terms, this basically involves using two (or possibly three) waves of fast units moving at a narrow frontage towards the enemy and breaking the units there.
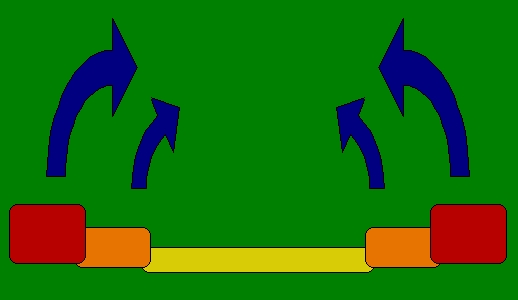
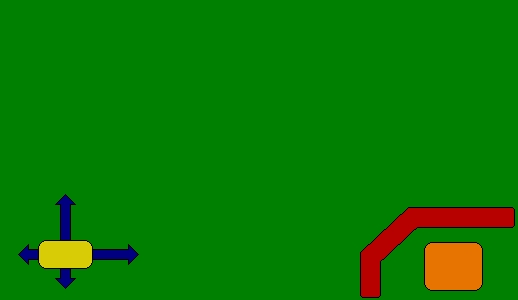
The basic idea is that the point section (orange) protects the hammer section (red) as they both move towards the enemy. The point section contains units that are, compared to the hammer section, tougher in relation to their points cost, which typically means that they are a lot cheaper and a bit easier to kill. While this is happening, the disruptive section does its best to keep enemy units from reinforcing the part of their line which is under threat. The most difficult trick to pull of with this trick is to have the hammer section screened from too much harm, while at the same time letting them charge when the time comes for that.
In the illustration above, for example, the hammer units (red) can charge forward because all of them have a line of sight past the point units (orange), but for the two hammer units of cavalry to be able to complete the charge, the point units must also declare charges, preferably out to either side so that even if their charge is failed, they should get out of the charge path of the units behind. The chariot would be able to charge anyway, but if it charges in alone against anything but a very weak unit it would need to be very lucky to win the combat.
Point section
The first-line units of the point section typically consists of reasonably expendable units protecting the nastier but more vulnerable hammer units of the second line, though it is not given that it consists only of very light troops. With my Ogre army, for example, when using this battle tactic, the first line would consist of units of Bulls, who in Ogre terms are reasonably cheap. These would be fairly large and most spells that enhance the resilience of Ogre units would be cast at them. With a Chaos army, on the other hand, you might field Warhounds in the first line and Knights and Chariots in the second.
In any case, as the lines approach the enemy, the first line units (who may now be somewhat reduced by enemy firepower), will open up a bit so that the units in the second line can get a line of sight. The first-line units typically charge off to one side while the mostly intact second line charges to the other side or straight ahead. The front line units might by now be too weak to punch through themselves, but should be able to either tie up enemy units or cause them to pursue out of line, disrupting the enemy formation.
The basic problem greenskins can have with this tactic is due to Animosity which makes it harder to coordinate an attack and can lead to the point unit holding up the hammer units with squabbling. For this reason I have found that with Orcs & Goblins attempting this tactic, the distance between the point section and the hammer section should be larger than in other armies, which means that even if your point units (Wolf Riders, mostly, though Spider Riders can also be used) squabble, the units of the hammer section will often be able to move around them and not get bogged down. The point units can still have a go at blocking lines of fire and diverting charges, but will often be less effective at this. And, as with Chaos Warhounds, you may find that the point units don't fare very well in combat.
Hammer section
The hammer units of the second line need to be nasty enough to punch though the enemy line in the first go pretty much all the time (for this reason, this tactic can be difficult to use against Undead, who never flee). These units tend to be quite expensive and rather vulnerable to getting shot at, which is why you use the point section to protect them on the way in. With greenskins, the hammer section would consist of tooled-up units of Boar Boyz (Savage Orc Boar Boy Big 'Uns can do ridiculous amounts of damage to things that don't have too much armour), preferably led by a decent fighter character and/or supported by chariots or Giants / Trolls. In my Ogre army this section would consist of Ironguts and Maneaters, who are more expensive than Bulls, hit harder but are not particularly harder to kill.
Disruptive section
While much fun is had elsewhere, the units in the disruptive section prevent enemy units from coming to the aid of the units threatened, in the same manner as units on the refused flank when using a refused flank battle tactic. As the tactics involved are basically the same, I will save some space by not repeating the advice given above here.
Castle
Using this formation, your small and elite (two words seldom used to describe greenskin armies!) force sets up in a very tight, defensive formation where they cannot be outmanoeuvred and any enemy units must take them on head-on and larger armies of weaker foes are forced to fight on a much narrower frontage, where they cannot bring their superior numbers to bear.
With the castle tactic, you have the wall section (red) which will take the brunt of the action. Any unit forming part of this line must be very tough, because you are probably not going to be able to dictate your battles and units here will probably end up facing the worst the enemy can throw at them. The tower section (orange) will mostly consist of firepower units (missile infantry, war machines, wizards, Night Goblin units with Fanatics, etc). Their task will be to fire over or past the units of the wall section in order to weaken enemy units as they advance to the point that they cannot defeat the wall units. In order to further foul up your opponent's plans (I love annoying units, I really do), it can be very wise to have a selection of disruptive units (yellow), to get in the way of enemy units, prevent them from marching and buying more time for your firepower units to thin them down.
This tactic is essentially defensive and hence somewhat unsuited to the Orcs & Goblins, who are more geared towards taking the offensive. Dwarfs, for example, do this tactic better as they have missile units that can both shoot well and fight well, whereas greenskins can really only do one or the other. The basic problem with defensive armies is that when you are defensive it's very easy to end up being very static, which can in turn lead to you being outmanoeuvred. This problem can be lessened by shortening your battle line and anchoring your flanks against impassable terrain or table edges. Obviously the best choice is to anchor both flanks against table edges, which is most easy to achieve by setting up in a corner. You can also use the castle in a more central position, but that means that instead of having to watch two sides, you have to watch three.
To be able to win with the castle tactic, you must have quite a bit of firepower . If you don't have this, you can forget about using this tactic because you are just going to hang around until your opponent can set up his charges to suit him best and then carry them out with unmolested units. What's worse: Even with a lot of firepower it can be very difficult to actually win a battle against an opponent who doesn't want to be defeated. A player might take a look at your castle and decide that it's going to be so difficult to beat that it isn't really worth it and that hiding away in the opposite corner, taking the odd war machine shot and then running out to claim three table quarters is more productive. Thus this tactic only really works against opponents who want to take the risk of either winning or losing big.
The wall section
As mentioned, units on the wall section must be tough. This goes doubly for wall units directly facing the enemy line, because enemy units attacking this section will have a much shorter path to move and hence you have less chance to shoot at them before they can charge you. Because you often cannot rely on other units supporting them if they get into trouble, having fighter characters to lead the units is highly recommended and you'd probably do better by going all defensive on magic and only having the bare minimum of wizards. A Battle Standard Bearer, on the other hand, can greatly improve the chance of your units holding.
The tower section
Whereas the wall units need to be very tough, this is not the case for those in the tower, who should ideally not ever get into combat and just hang back and support the wall units. Ideally, you want the tower units on a hill, as this lets the units fire over the heads of the wall units below. (A note to anywone playing against Dwarves, if your opponent has a habit of setting up a hill in each diagonally opposite corner, insist on random terrain and you will get much more interesting battles.) If you cannot find a suitable hill, units in the tower section will be reduced to firing in between units in the wall, which more or less means that missile units are not going to be very effective.
The disruptive section
Any tactic that isn't agressive across the line should have some sort of disruptive section because any delay you can cause to the enemy attacking units can greatly increase the chances of your actual castle. Generally, disruptive units tend to end up being placed on the flank opposite the castle itself, where they function pretty much the same as in a refused flank tactic. Obviously it would be desireable to have some sort of disruptive unit next to the castle because the enemy units advancing there will be coming at you a lot sooner and thus any delay you can cause will slow them down proportionally longer. However, units placed there will tend to end up in between the two battle lines, which is not an ideal place for a disruptive unit as it might end up fleeing into their own lines and causing Panic. However, if you have units that can get behind the enemy line as it advances and either prevent them from marching or even charging them in the rear then this is highly useful. Flyers and units that have the ability to appear behind enemy lines (Gorgers, Miners, Beast Herds) are all candidates for this.
Other related articles
| Back to the Orcs & Goblins Tactics page | Back to the Main page |